Wednesday, July 20, 2016

UBUNTU (Zero2Pro)

UBUNTU TRAINING DOCUMENT
PREPARED BY: RAM NATH (ALPHA DATA LLC)
Download Ubuntu.

Add a user
[1] If you'd like to add new user, Add like follows.
# add a new user "ubuntu"
ram@ubuntu:~$ sudo adduser ubuntu
[2] If you'd like to give privileges to a new user, Do like follows.
ram@:~$ sudo usermod -G sudo ubuntu
ram@ubuntu:~$ su - ubuntu
ubuntu@ubuntu:~$ sudo reboot
[sudo] password for ubuntu: # password for 'ubuntu'
Enable root Account:
The root Account in Ubuntu is disabled by default bcause his password is not set. But if you'd like to use root Account by some reason, it's possible to use like follows.
[1] The user account added during installation is set an administrative account with Sudo, so it's easy to get root account's shell like follows.
ram@ubuntu:~$ sudo -s
[sudo] password for ram: # own password
root@ubuntu:~# # switched
[2] Or it's possible to switch to root account with su command to set root account's password.
ram@ubuntu~$ sudo passwd root
ram@ubuntu:~$ su -
Password:# input root password
root@ubuntu:~#
The examples on this site shows as a root account. If you use Sudo, add "sudo" on the head of commands. It had better to limit user if you enable root account.
For using by Sudo, it's possible to limit to prohibit shells in sudoers config, refer to details about Sudo Settings.
[3] For limit to do su command, set like follows.
root@ubuntu:~# vi /etc/pam.d/su
# line 15: uncomment and add a group which is allow to do su command
auth required pam_wheel.so group=adm
root@ubuntu:~# usermod -G adm ubuntu
root@ubuntu:~# vi /etc/network/interfaces
# add these lines
iface eth0 inet static
address 10.0.0.30# IP address
network 10.0.0.0# network address
netmask 255.255.255.0# subnet mask
broadcast 10.0.0.255# broadcast address
gateway 10.0.0.1# default gateway
dns-nameservers 10.0.0.10# name server
root@ubuntu:~# ifdown eth0 && ifup eth0
Disable IPv6:
root@ubuntu:~# echo "net.ipv6.conf.all.disable_ipv6 = 1" >> /etc/sysctl.conf
root@ubuntu:~# sysctl -p
Configure Services
Configure Services (Upstart and SysVinit)
UPSTART:
The one with "start/running" is executed when booting the system.
root@ubuntu:~# initctl list
mountnfs-bootclean.sh start/running
rsyslog start/running, process 689
tty4 start/running, process 1090
udev start/running, process 531
upstart-udev-bridge start/running, process 520
[2] For Upstart one, the configuration file is under "/etc/init". Jobs are controled by them.
For example, if you'd like to stop "atd" and disable autostart, set like follows.
root@ubuntu:~# initctl stop atd
atd stop/waiting
root@ubuntu:~# vi /etc/init/atd.conf
# Comment out
# start on runlevel [2345]

[3] It's possible to know jobs like follows which are executed when booting. And also it's possible to know the meanings for "start on ***" with "man upstart-events".
root@ubuntu:~# grep "start on" /etc/init/*
/etc/init/acpid.conf:start on runlevel [2345]
/etc/init/apport.conf:start on runlevel [2345]
/etc/init/atd.conf:#start on runlevel [2345]
root@ubuntu:~# man upstart-events
Table 1: Well-Known System Events Summary.

[4] For SysVinit one, for example, NTP, it's easy to manage them to install a tool like follows.
root@ubuntu:~# aptitude -y install sysv-rc-conf
root@ubuntu:~# sysv-rc-conf --list # list services
root@ubuntu:~# sysv-rc-conf ntp on # set auto-start for NTP
root@ubuntu:~# sysv-rc-conf ntp off # disable auto-start for NTP

Update System:
Run Aptitude repository update:
root@ubuntu:~# aptitude update
Run update the system
root@ubuntu:~# aptitude -y upgrade
Configuring SUDO
root@ubuntu:~# aptitude install sudo -y
To edit sudoers file, we use:
root@ubuntu:~# visudo
To give specific command permissions to certain user:

You can then give a specific user privileges to those commands like so:

The logs for sudo are kept in '/var/log/auth.log', but there are many kind of logs in it. So if you'd like to keep only sudo's log in a file, Set like follows:
root@ubuntu:~#visudo
--
# add at the last
Defaults syslog=local1
--
root@ubuntu:~# vi /etc/rsyslog.d/50-default.conf
# line 8: add
local1.* /var/log/sudo.log
auth,authpriv.* /var/log/auth.log
*.*;auth,authpriv.none -/var/log/syslog

root@ubuntu:~# initctl restart rsyslog
Install NTPd and Configure NTP server for time adjustment. NTP uses 123/UDP
root@ubuntu:~# aptitude -y install ntp
Comment-out existing servers and Add below servers as NTP servers:
vi /etc/ntp.conf
#server 0.ubuntu.pool.ntp.org
#server 1.ubuntu.pool.ntp.org
#server 2.ubuntu.pool.ntp.org
#server 3.ubuntu.pool.ntp.org
 3.asia.pool.ntp.org (128.199.219.72)
 2.asia.pool.ntp.org (157.7.208.12)
1.asia.pool.ntp.org (45.118.133.241)
# line 48: add the network range you allow to receive requests
restrict 10.0.0.0 mask 255.255.255.0 nomodify notrap
#service ntp restart
#ntpq -p #to check
You can also use crony as an alternative (to ntp).
Client also check /etc/ntp.cong for server. You need to specify the at Client side:
vi /etc/ntp.conf
server
To Update time instantly:
ntpdate
SSH server configuration:
root@ubuntu:~# aptitude install openssh-server -y
You can change below configuration for root direct login (enable/disable)
root@ubuntu:~# grep -i root /etc/ssh/sshd_config
PermitRootLogin without-password
Install ssh Client :
root@ubuntu:~# aptitude -y install openssh-client
To ssh to a remote machine, use:
#ssh -l
Transferring a file:
root@ubuntu:~# scp ram@ubuntu:/tmp/test /var/tmp/test
ram@ubuntu's password:
test 100% 245 0.2KB/s 00:00
ram@ubuntu's password:
Connected to ubuntu.
Fetching /tmp/test to /var/tmp/test
/tmp/test 100% 245 0.2KB/s 00:00
root@ubuntu:~# sftp ram@ubuntu
ram@ubuntu's password:
Connected to ubuntu.
sftp> pwd
Remote working directory: /home/ram
When using Windows, use WINSCP to connect to the ssh server and transfer files
SSH KEY-PAIR AUTHENTICATION
ram@ubuntu:~$ ssh-keygen #optionally you can use rsa or dsa using type (-t) option
ram@ubuntu:~$ ls .ssh
id_rsa id_rsa.pub
ram@ubuntu:~$ ssh-copy-id 192.168.171.171 #ssh Client IP
And now, you have password less access to ssh-serverIf you set "PasswordAuthentication no", it's more secure.
ram@ubuntu:~$ grep PasswordAuthentication /etc/ssh/sshd_config
#PasswordAuthentication yes
root@ubuntu:~# initctl restart ssh
ssh start/running, process 2637
Windows ssh client putty:
http://www.chiark.greenend.org.uk/~sgtatham/putty/download.html
DNS FILES
/etc/resolv.conf # File where you specify DNS SERVER INFO
/etc/hosts #File acts as local dns resolver
/etc/nsswitch.conf #File to specify which dns (file or server ) gets resolve priority
File Sharing methods in Linux:
NFS
Samba
SFTP
FTP
SCP
RSYNC
Linux can serve any (all) of the following Storage Server(s):
LVM
NFS
ISCSI
Ceph
Gluster
SMB
Linux can use any (all) of the following Storage as Client:
LVM
NFS
ISCSI
FC
Ceph
Glusterfs
SMB
NFS Server and Client Configurations:
1) Install NFS server
#aptitude -y install nfs-kernel-server
2) introduce an NFS share
#vi /etc/exports
3) Restart NFS Server
# /etc/init.d/nfs-kernel-server restart
 Client Configuration:
#aptitude -y install nfs-common
#initctl restart idmapd
#showmount -e
#mount -t nfs 192.168.171.171:/srv/nfs4 /mnt
#df -kh
#mount
#vi /etc/fstab
ISCSI Server installation (For Testing):
Install ISCSI server:
aptitude -y install iscsitarget iscsitarget-dkms
Create a Test Disk
dd if=/dev/zero of=/iscsi_disks/disk01.img count=0 bs=1 seek=500M
Make sure that ISCSITARGET_ENABLE is true, run following command to check this:
root@ubuntu:~# grep ISCSITARGET_ENABLE /etc/default/iscsitarget
ISCSITARGET_ENABLE=true
Update configuration file
#vi /etc/iet/ietd.conf
--
# add follows to the end
# if you set some devices, add *** and set the same way with follows
# naming rule : [ iqn.yaer-month.domain:any name ]
Target iqn.2015-05.world.srv:target00
# provide device as a iSCSI target
Lun 0 Path=/iscsi_disks/disk01.img,Type=fileio
# iSCSI Initiator's IP address you allow to connect
initiator-address 192.168.171.171
# authentication info ( set anyone you like for "username", "password" )
incominguser ram password
--
Restart the ISCSI Daemon:
/etc/init.d/iscsitarget restart
Confirm status
ietadm --op show –tid=1
CLIENT Configurations:
Client package Installation:
#aptitude -y install open-iscsi
Specify the authentication:
root@ubuntu:~# vi /etc/iscsi/iscsid.conf
# authentication by the target(s), uncomment the following lines:
node.session.auth.username = ram
node.session.auth.password = password
Discover Targets:
root@ubuntu:~# iscsiadm -m discovery -t sendtargets -p 192.168.171.171
192.168.171.171:3260,1 iqn.2015-05.world.srv:target00

Confirm Status After Discovery:
root@ubuntu:~# iscsiadm -m node -o show 
Login to the target:
root@ubuntu:~# iscsiadm -m node --login
Logging in to [iface: default, target: iqn.2015-05.world.srv:target00, portal: 192.168.171.171,3260] (multiple)
Login to [iface: default, target: iqn.2015-05.world.srv:target00, portal: 192.168.171.171,3260] successful.
Check sessions:
root@ubuntu:~# iscsiadm -m session -o show
tcp: [1] 192.168.171.171:3260,1 iqn.2015-05.world.srv:target00
Confirm Partition:
root@ubuntu:~# cat /proc/partitions
major minor #blocks name
8 0 20971520 sda
8 1 19921920 sda1
8 2 1 sda2
8 5 1046528 sda5
11 0 1048575 sr0
8 16 512000 sdb ← Our newly added lun
root@ubuntu:~# fdisk -l /dev/sdb
Disk /dev/sdb: 524 MB, 524288000 bytes
17 heads, 59 sectors/track, 1020 cylinders, total 1024000 sectors
Units = sectors of 1 * 512 = 512 bytes
Sector size (logical/physical): 512 bytes / 512 bytes
I/O size (minimum/optimal): 512 bytes / 512 bytes
Disk identifier: 0x00000000
Disk /dev/sdb doesn't contain a valid partition table
You have an up and online LUN in your system.
Disk Management tools:
fdisk
parted
Install Parted:
root@ubuntu:~#aptitude -y install parted
Create a label:
root@ubuntu:~# parted --script /dev/sdb "mklabel msdos"
Create a partition:
root@ubuntu:~# parted --script /dev/sdb "mkpart primary 0% 100%"
Create EXT4 Filesystem:
root@ubuntu:~# mkfs.ext4 /dev/sdb1
Mount the file system and check:
root@ubuntu:~# mount /dev/sdb1 /mnt
root@ubuntu:~# df -hT
FDISK
Create a partition on disk
root@ubuntu:~# fdisk /dev/sdb
Command (m for help): m # Use 'm' print the menu
Command action
a toggle a bootable flag
b edit bsd disklabel
c toggle the dos compatibility flag
d delete a partition
l list known partition types
m print this menu
n add a new partition
o create a new empty DOS partition table
p print the partition table
q quit without saving changes
s create a new empty Sun disklabel
t change a partition's system id
u change display/entry units
v verify the partition table
w write table to disk and exit
x extra functionality (experts only)
Search tools (commands):
Find
locate
grep
Linux can serve as any of the following Virtual server :
KVM
Xen
LXC (for containers)
Docker (for Container)
Openstack (Cloud computing)
Cloud-stack (Cloud computing)
VMware Workstation
Virtualbox (Oracle)
Many more
This is a rough (initial) document. Please share your feedback on this. I would be coming as with Proper Ubuntu "Zero2Pro" document soon.

Sunday, July 17, 2016

Procedure to update your hosted engine from 3.5 to 3.6

Procedure to update your hosted engine from 3.5 to 3.6 For going to 3.6 you need to have your host on 7.x, if your host are currently not on 7.x then you need to update your host first. For detailed procedure for updating your hosted engine to 3.6 please refer below document. ~~~~~~~~~~~~~~~~~~~~~~~~~~~~~~~~~~~~~~~~~~~~~~~~~~~~~~~~~~~~~~~~~~~~~~~~~~~~~~~~~~~~~~~~~~~~~~ Topic :- 3.5. Upgrading the Self-Hosted Engine Link :- https://access.redhat.com/documentation/en-US/Red_Hat_Enterprise_Virtualization/3.6/html-single/Upgrade_Guide/index.html#Upgrading_the_Self-Hosted_Engine1 ~~~~~~~~~~~~~~~~~~~~~~~~~~~~~~~~~~~~~~~~~~~~~~~~~~~~~~~~~~~~~~~~~~~~~~~~~~~~~~~~~~~~~~~~~~~~~~

Saturday, July 16, 2016

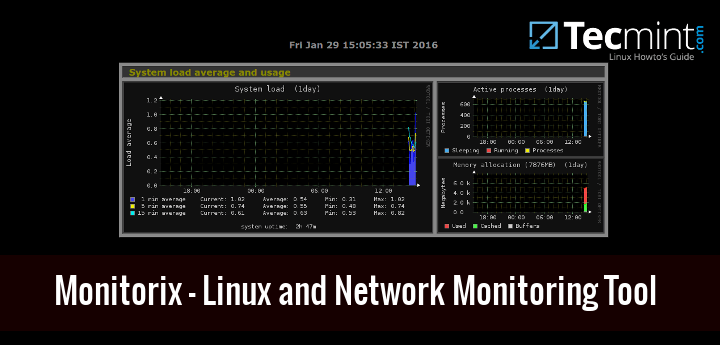
Monitorix, a lightweight system and network monitoring tool for linux

Monitorix is an open source, free and most powerful lightweight tool designed to monitor system and network resources in Linux. It regularly collects system and network data and display the information in graphs using its own web interface. Monitorix allows to monitor overall system performance and also help in detecting bottlenecks, failures, unwanted long response times and other abnormal activities.

http://www.tecmint.com/monitorix-a-lightweight-system-and-network-monitoring-tool-for-linux/
Linux System and Network Monitoring Tool
Monitorix – Linux System and Network Monitoring Tool
It is written in Perl language and licensed under the terms of GNU (General Public License) as published by theFSP (Free Software Foundation). It uses RRDtool to generate graphs and display them using web interface.
This tool is specifically created for monitoring Red HatCentOSFedora based Linux systems, but today it runs on many different flavors of GNU/Linux distributions and even it runs on UNIX systems like OpenBSDNetBSDand FreeBSD.
The development of Monitorix is currently in active state and adding new features, new graphs, new updates and fixing bugs to offer a great tool for Linux system/network administration.

Monitorix Features

  1. System load average, active processes, per-processor kernel usage, global kernel usage and memory allocation.
  2. Monitors Disk drive temperatures and health.
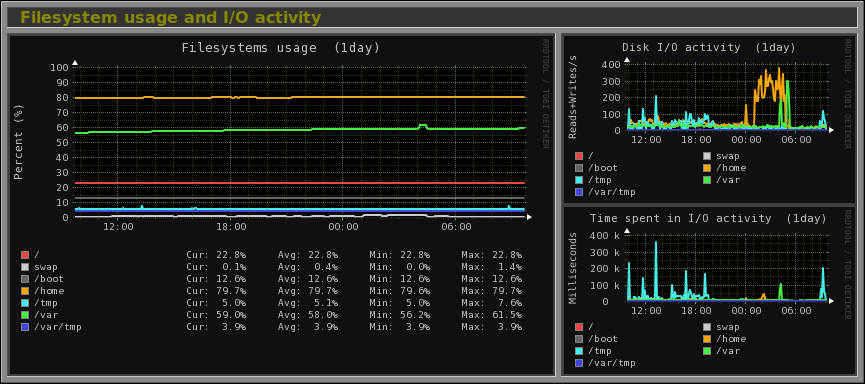
  3. Filesystem usage and I/O activity of filesystems.
  4. Network traffic usage up to 10 network devices.
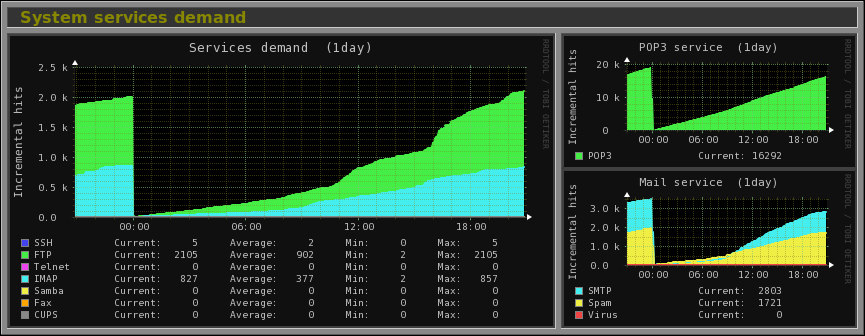
  5. System services including SSH, FTP, Vsftpd, ProFTP, SMTP, POP3, IMAP, POP3, VirusMail and Spam.
  6. MTA Mail statistics including input and output connections.
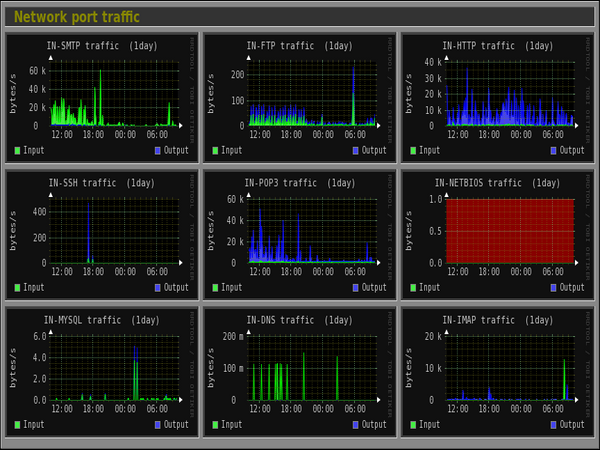
  7. Network port traffic including TCP, UDP, etc.
  8. FTP statistics with log file formats of FTP servers.
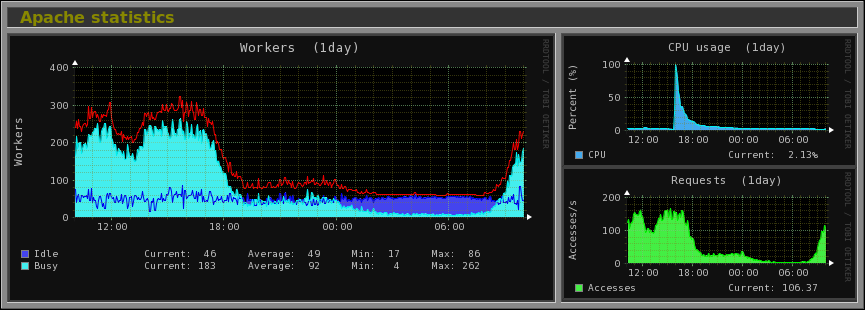
  9. Apache statistics of local or remote servers.
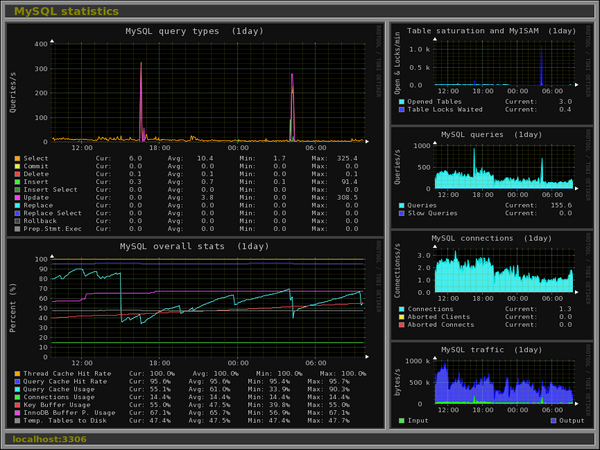
  10. MySQL statistics of local or remote servers.
  11. Squid Proxy Web Cache statistics.
  12. Fail2ban statistics.
  13. Monitor remote servers (Multihost).
  14. Ability to view statistics in graphs or in plain text tables per day, week, month or year.
  15. Ability to zoom graphs for better view.
  16. Ability to define the number of graphs per row.
  17. Built-in HTTP server.
For a full list of new features and updates, please check out the official feature page.

Installing Monitorix on a RHEL/CentOS/Fedora Linux

First, install following required packages.
# yum install rrdtool rrdtool-perl perl-libwww-perl perl-MailTools perl-MIME-Lite perl-CGI perl-DBI perl-XML-Simple perl-Config-General perl-HTTP-Server-Simple perl-IO-Socket-SSL wget
If in case yum fails to installing one or more of above packages, then you could enable following additional repositories to install them.
  1. Enable EPEL repository
  2. Enable RPMforge repository
Next, download the latest version of ‘Monitorix‘ package using wget command.
# wget http://www.monitorix.org/monitorix-3.8.1-1.noarch.rpm
Once successfully downloaded, install it using the rpm command.
# rpm -ivh monitorix-3.8.1-1.noarch.rpm
Preparing...                ########################################### [100%]
1:monitorix              ########################################### [100%]
Once successfully installed, please have a look at the main configuration file ‘/etc/monitorix.conf‘ to add some extra settings according to your system and enable or disable graphs.
Finally, add Monitorix service to system start-up and start the service with following commands.
# chkconfig --level 35 monitorix on
# service monitorix start        
# systemctl start monitorix       [On RHEL/CentOS 7 and Fedora 22+ versions ]
Once, you’ve started service, the program will start collecting system information according to configuration set in ‘/etc/monitorix.conf‘ file, and after few minutes you will start seeing system graphs from your browser at.
http://localhost:8080/monitorix/
If you have SELinux in enabled state, then graphs are not visible and you will get tons of error messages in ‘/var/log/messages‘ or ‘/var/log/audit/audit.log‘ file about access denied to RRD database files. To get rid of such errors messages and visible graphs, you need to disable SELinux.
To Turn Off SELinux, simple changing the line “enforcing” to “disabled” in ‘/etc/selinux/config’ file.
SELINUX=disabled
The above will disable SELinux temporarily, until you reboot the machine. If you want the system to start in always disable mode, you need to reboot the system.

Installing Monitorix on a Ubuntu/Debian/Linux Mint

The Monitorix installation can be done in two-ways, using Izzy repository for automatic installation/updates and another using manually download and install .deb package.
The Izzy repository is an experimental repository but the packages from this repository should work on all versions of UbuntuDebian, etc. However, no warranties are given – So, the risk is all yours. If you still want to add this repository for automatic updates via apt-get, simply follow the steps provided below for automatic installation.

Automatic Installation Using Izzy Repository

Add the following line to your ‘/etc/apt/sources.list’ file.
deb http://apt.izzysoft.de/ubuntu generic universe
Get GPG key for this repository, you can get it using wget command.
# wget http://apt.izzysoft.de/izzysoft.asc
Once downloaded, add this GPG key to apt configuration by using the command ‘apt-key‘ as shown below.
# apt-key add izzysoft.asc
Finally, install the package via the repository.
# apt-get update
# apt-get install monitorix

Manual Installation Using .Deb Package

Manually, downloading latest version of .deb package and install it with taking care of required dependencies as shown below.
# apt-get update
# apt-get install rrdtool perl libwww-perl libmailtools-perl libmime-lite-perl librrds-perl libdbi-perl libxml-simple-perl libhttp-server-simple-perl libconfig-general-perl libio-socket-ssl-perl
# wget http://www.monitorix.org/monitorix_3.8.1-izzy1_all.deb
# dpkg -i monitorix_3.8.1-izzy1_all.deb
During installation, a web server configuration takes place. So, you need to reload the Apache web server to reflect new configuration.
# service apache2 restart         [On SysVinit]
# systemctl restart apache2       [On SystemD]
Monitorix comes with a default configuration, if you wish to change or adjust some settings take a look at the configuration file at ‘/etc/monitorix.conf‘. Once you’ve done changes reload the service for new configuration to take effect.
# service monitorix restart         [On SysVinit]
# systemctl restart monitorix       [On SystemD]
Now point your browser to ‘http://localhost:8080/monitorix‘ and start watching graphs of your system. It can be accessed from localhost only, if you wish to allow access to remote IP’s. Simply open the ‘/etc/apache2/conf.d/monitorix.conf‘ file and add IP’s to the ‘Allow from‘ clause. For example see below.

DirectoryIndex monitorix.cgi
Options ExecCGI
Order Deny,Allow
Deny from all
Allow from 172.16.16.25
After you made changes to above configuration, do not forget to restart Apache.
# service apache2 restart         [On SysVinit]
# systemctl restart apache2       [On SystemD]

Monitorix Screenshots

Please check out the following are some screenshots.

Monitorix Homepage

Monitorix Homepage
Monitorix Homepage

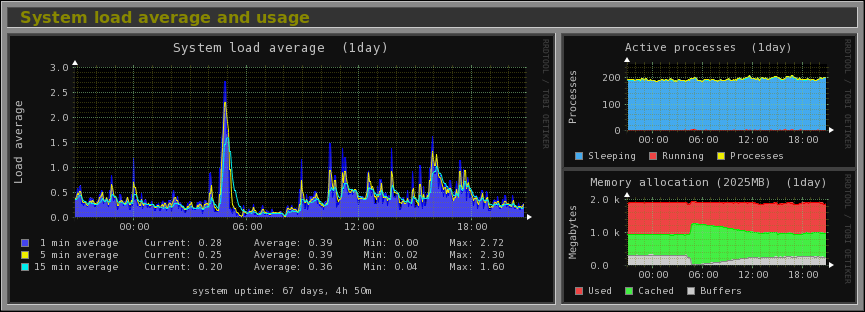
Monitor Linux Load Average

System load average, active processes and memory allocation.

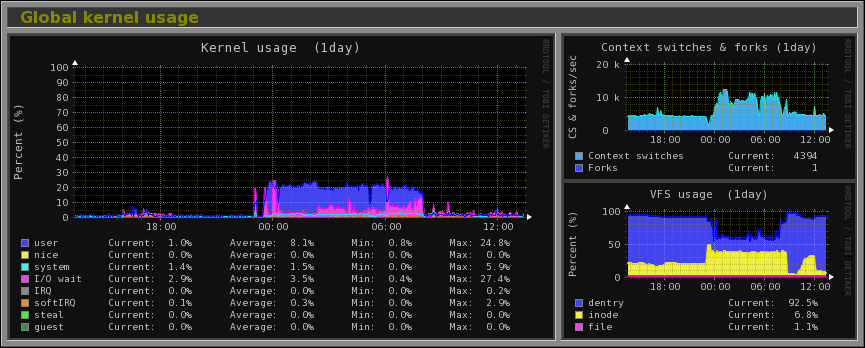
Monitor Linux Kernel Usage

Global kernel usage
Global kernel usage

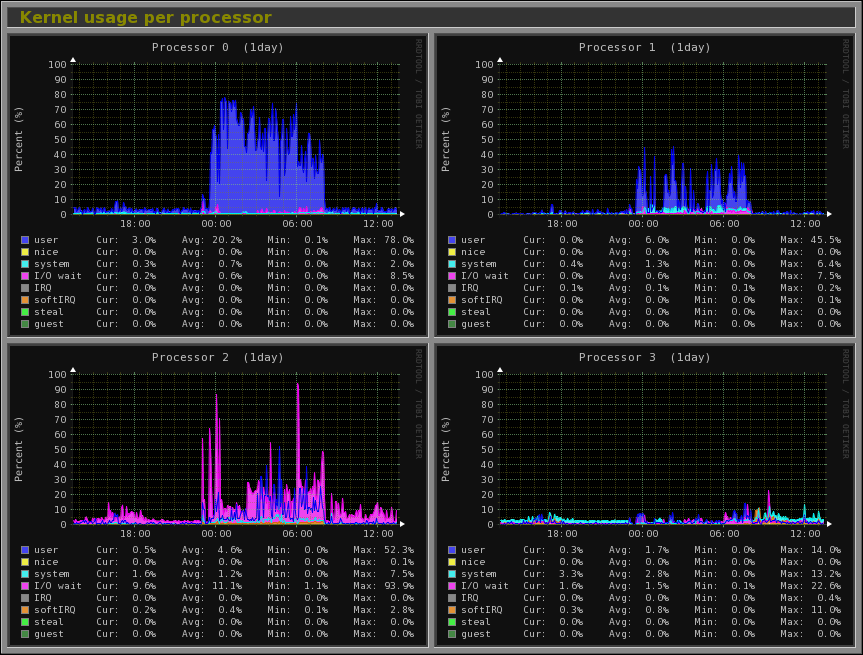
Monitor Linux Kernel Processor

Per-processor kernel usage.

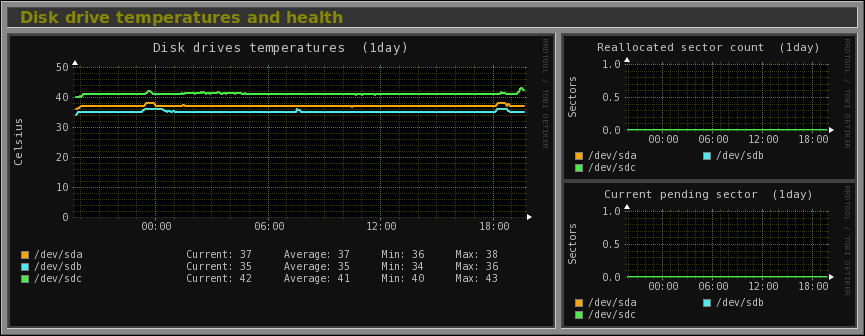
Monitor Linux Disk Health

Disk drive temperatures and health.

Monitor Linux Filesystem and Disk I/O Read

Filesystem usage and I/O activity.

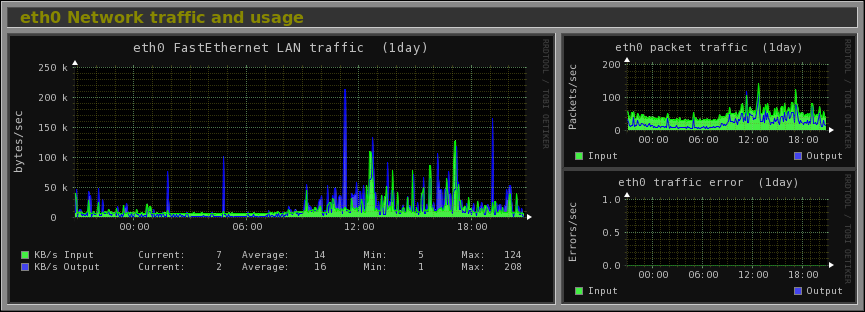
Monitor Linux Network Traffic

eth0 interface traffic

Monitor Linux System Services

System services demand

Monitor Linux Network Port Traffic

Network Port Traffic

Monitor Linux Apache Statistics

Apache Statistics
Apache Statistics

Monitor MySQL/MariaDB Statistics

MySQL Statistics
MySQL Statistics

Tuesday, June 28, 2016

Configuring a Whitelist for SQUID PROXY

Configuring a Whitelist

Open the squid configuration file, which on Linux should be in the following location:
/etc/squid/squid.conf
Squid whitelists are created using the acl whitelist directive.
To setup a small whitelist of sites, you can add them directly to the Squid conf file. To do this, add the following directives to the Squid conf file:
acl whitelist dstdomain .example.com .google.com .bing.com
http_access allow whitelist
Note: Make sure you add this http_access line before the http_access line that allows proxy authenticated connections (this is the one that you would have added to configure proxy authentication). Otherwise the whitelist will not work.
In this example three domains are whitelisted. The whitelist includes all subdomains of these sites as well.
Save the configuration file. We are now ready to start Squid. If Squid is already running, reload the configuration file using the following command:
squid -k reconfigure
If squid is not already running, start it using the following command:
service squid start
Open a browser on a client machine. If you browse to one of the sites in the whitelist, Squid should not ask for a username and password. If you browse to any other site, Squid should ask you for a username and password.
Although this works, an easier to maintain solution would be to create a file of whitelisted sites. To do this, change the acl whitelist directive as follows:
acl whitelist dstdomain "/etc/squid/sites.whitelist.txt"
Next create a file called /etc/squid/sites.whitelist.txt and add in a list of sites to be whitelisted. For example:
.example.com
.google.com
.bing.com
Save the configuration file.
We are now ready to start Squid. If Squid is already running, reload the configuration file by running the following command as the root user:
squid -k reconfigure
If squid is not already running, start it by running the following command as the root user:
/etc/init.d/squid start

Wednesday, June 15, 2016

Configuring HTTP Proxy in the CLI for yum updates

Configuring HTTP Proxy in the CLI

  • Run the subscription-manager command as follows:
    # subscription-manager config --server.proxy_hostname=proxy.example.com --server.proxy_port=8080 --server.proxy_user=admin --server.proxy_password=secret
  • Also edit /etc/yum.conf for http://:8080

Wednesday, June 8, 2016

engine-image-uploader ERROR: not a gzip file!! ->> Creating an OVF Archive That is Compatible with the Image Uploader!

Creating an OVF Archive That is Compatible with the Image Uploader
  1. Run the tar -zcvf my.ovf images/ master/ command to create the tar/gzip ovf archive.
  2. Anyone you give the resulting ovf file to (in this example, called my.ovf) can import it to Red Hat Enterprise Virtualization Manager using the engine-image-uploader command.

You have created a compressed OVF image file that can be distributed. Anyone you give it to can use the engine-image-uploader command to upload your image into their Red Hat Enterprise Virtualization environment.