Sunday, August 21, 2016
Friday, August 19, 2016
How to Use Rsync to Sync New or Changed/Modified Files in Linux
How to Use Rsync to Sync New or Changed/Modified Files in Linux
Download Your Free eBooks NOW - 10 Free Linux eBooks for Administrators | 4 Free Shell Scripting eBooks
As a system administrator or Linux power user, you may have probably come across or even on several occasions, used the versatile Linux Rsync tool, which enables users to expeditiously copy or synchronize files locally and remotely. It is as well a great tool popularly used for backup operations and mirroring.
Some of its eminent features and advantages include; it is exceptionally versatile in that, it can copy locally, to/from a remote shell or remote rsync, it is also remarkably flexible, allowing users to specify any number of files to copy.
One imperative differential of rsync in comparison to other file-coying commands in Linux is its use of the remote-update protocol, to transfer only the difference between files or directory content.
Therefore, in this article, we shall examine how rsync can help us only sync new or changed files or directory content while making backups and beyond in Linux.
To start with, you need remember that the conventional and simplest form of using rsync is as follows:
By default, rsync only copies new or changed files from a source to destination, when I add a new file into my Documents directory, this is what happens after running the same command second time:
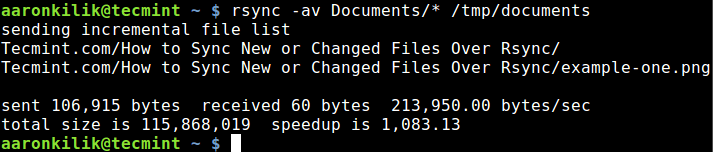
As you can observe and notice from the output of the command, only the new file is copied to the destination directory.
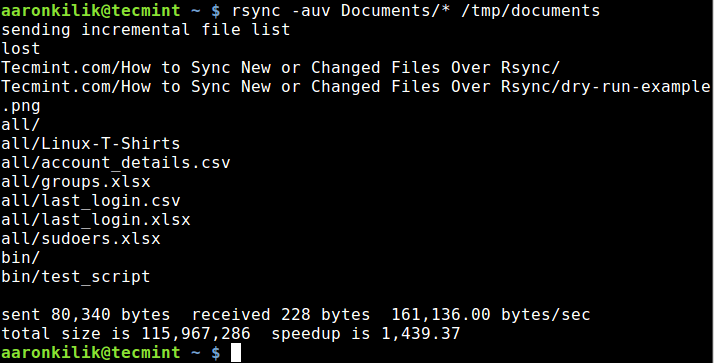
After executing a test run, we can then do away with the
Subsequently, to sync only updated or modified files on the remote machine that have changed on the local machine, we can perform a dry run before copying files as below:
To update existing files and prevent creation of new files in the destination, we utilize the
You can run through the
Most importantly, you can as well share your view on the examples we have covered here or even better still, offer us valuable tips on using this vital command line tool through the comment section below.
Some of its eminent features and advantages include; it is exceptionally versatile in that, it can copy locally, to/from a remote shell or remote rsync, it is also remarkably flexible, allowing users to specify any number of files to copy.
Suggested Read: 10 Practical Examples of Rsync Command in Linux
Furthermore, it permits copying of links, devices, file or directory owner, groups and the permissions. It also supports usage without root privileges coupled with many more.One imperative differential of rsync in comparison to other file-coying commands in Linux is its use of the remote-update protocol, to transfer only the difference between files or directory content.
To start with, you need remember that the conventional and simplest form of using rsync is as follows:
# rsync options source destinationThat said, let us dive into some examples to uncover how the concept above actually works.
Syncing Files Locally Using Rsync
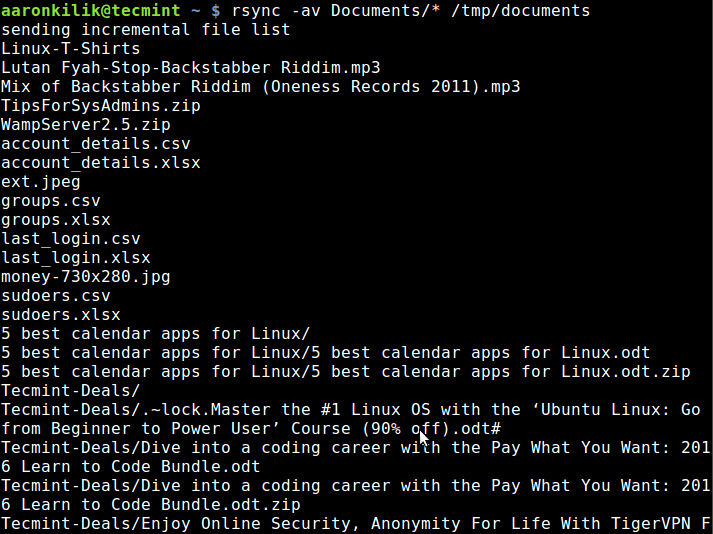
Using the command below, am able to copy files from my Documents directory to /tmp/documents directory locally:$ rsync -av Documents/* /tmp/documentsIn the command above, the option:
-a– means archive mode-v– means verbose, showing details of ongoing operations

Sync Files Locally
$ rsync -av Documents/* /tmp/documents

Sync New Updated Files
Suggested Read: How to Sync Two Apache Web Servers/Websites Using Rsync
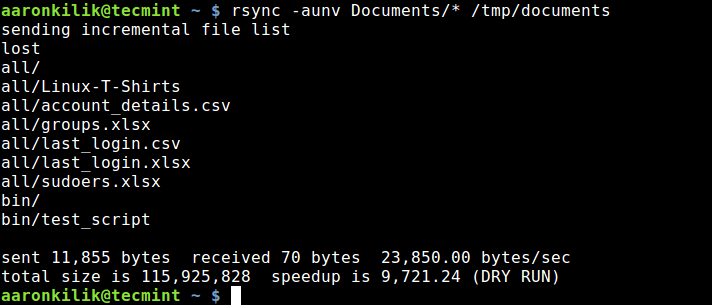
The --update or -u option allows rsync to skip files that are still new in the destination directory, and one important option, --dry-run or -n enables us to execute a test operation without making any changes. It shows us what files are to be copied.$ rsync -aunv Documents/* /tmp/documents

Dry Run Rsync Before Syncing Files
-n and perform a real operation:$ rsync -auv Documents/* /tmp/documents

Sync Updated Files
Syncing Files From Local to Remote Linux
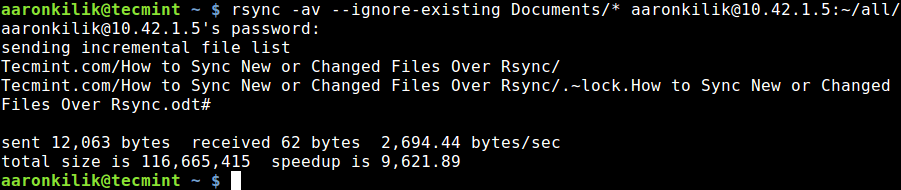
In the example below, I am copying files from my local machine to a remote sever with the IP address – 10.42.1.5. So as to only sync new files on the local machine, that do not exist on the remote machine, we can include the--ignore-existing option:$ rsync -av --ignore-existing Documents/* aaronkilik@10.42.1.5:~/all/

Sync Files Local to Remote Linux
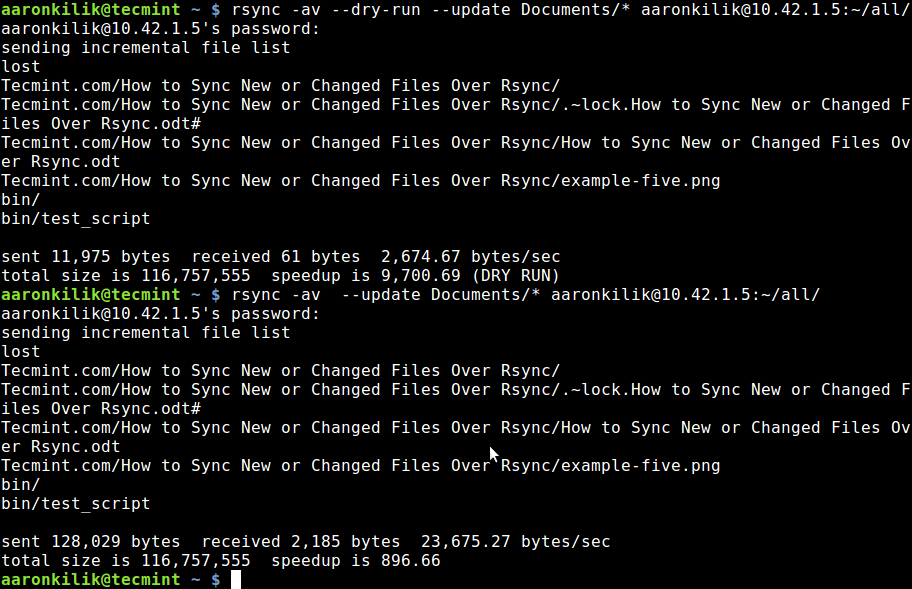
$ rsync -av --dry-run --update Documents/* aaronkilik@10.42.1.5:~/all/
$ rsync -av --update Documents/* aaronkilik@10.42.1.5:~/all/

Check Sync Only Updated Files
--existing option.You can run through the
rsync man page to discover additionally useful options for advanced usage, as I had mentioned earlier on, rsync is a very powerful and versatile Linux tool and many System Administrator and Linux power users know just how advantageous it is.Most importantly, you can as well share your view on the examples we have covered here or even better still, offer us valuable tips on using this vital command line tool through the comment section below.
Sunday, August 14, 2016
Migrating VMWARE Image (OVA) to RHEV 3.5 as a VM
I would like to share with you this secret way of migrating any VM from any hypervisor to RHEV. Red Hat has not mentioned this anywhere on the internet so I would recommend you to do this only on test environments:
1) Extract the OVA image using: tar xvf CFusion-server.ova
2) Convert the extracted VMDK disk file to raw lvm image using: qemu-img convert -f vmdk CFusion-server-disk1.vmdk -O raw CFusion-server-disk1.img
3) SCP the image (.img file) to you NFS exports server (also, Check the VM size)
4) In RHEVM, create a VM with same sized disk (preallocated)
5) Export that VM (to export NFS) and delete the newly created VM
6) Check the export VM image in images folder on NFS export location
7) Put export in maintenance mode and on nfs server, use dd command to write the main exported disk file under images folder
8) Now, activate the export again
9) Create a VM with THIN disk from exported image
You can see that VM is ready for its first run!
Tuesday, July 26, 2016
Wednesday, July 20, 2016
UBUNTU (Zero2Pro)
UBUNTU TRAINING DOCUMENT
PREPARED BY: RAM NATH (ALPHA DATA LLC)
Download Ubuntu.
Add a user
[1] If you'd like to add new user, Add like follows.
# add a new user "ubuntu"
ram@ubuntu:~$ sudo adduser ubuntu
[2] If you'd like to give privileges to a new user, Do like follows.
ram@:~$ sudo usermod -G sudo ubuntu
ram@ubuntu:~$ su - ubuntu
ubuntu@ubuntu:~$ sudo reboot
[sudo] password for ubuntu: # password for 'ubuntu'
Enable root Account:
The root Account in Ubuntu is disabled by default bcause his password is not set. But if you'd like to use root Account by some reason, it's possible to use like follows.
[1] The user account added during installation is set an administrative account with Sudo, so it's easy to get root account's shell like follows.
ram@ubuntu:~$ sudo -s
[sudo] password for ram: # own password
root@ubuntu:~# # switched
[2] Or it's possible to switch to root account with su command to set root account's password.
ram@ubuntu~$ sudo passwd root
ram@ubuntu:~$ su -
Password:# input root password
root@ubuntu:~#
The examples on this site shows as a root account. If you use Sudo, add "sudo" on the head of commands. It had better to limit user if you enable root account.
For using by Sudo, it's possible to limit to prohibit shells in sudoers config, refer to details about Sudo Settings.
[3] For limit to do su command, set like follows.
root@ubuntu:~# vi /etc/pam.d/su
# line 15: uncomment and add a group which is allow to do su command
auth required pam_wheel.so group=adm
root@ubuntu:~# usermod -G adm ubuntu
root@ubuntu:~# vi /etc/network/interfaces
# add these lines
iface eth0 inet static
address 10.0.0.30# IP address
network 10.0.0.0# network address
netmask 255.255.255.0# subnet mask
broadcast 10.0.0.255# broadcast address
gateway 10.0.0.1# default gateway
dns-nameservers 10.0.0.10# name server
root@ubuntu:~# ifdown eth0 && ifup eth0
Disable IPv6:
root@ubuntu:~# echo "net.ipv6.conf.all.disable_ipv6 = 1" >> /etc/sysctl.conf
root@ubuntu:~# sysctl -p
Configure Services
Configure Services (Upstart and SysVinit)
UPSTART:
The one with "start/running" is executed when booting the system.
root@ubuntu:~# initctl list
mountnfs-bootclean.sh start/running
rsyslog start/running, process 689
tty4 start/running, process 1090
udev start/running, process 531
upstart-udev-bridge start/running, process 520
[2] For Upstart one, the configuration file is under "/etc/init". Jobs are controled by them.
For example, if you'd like to stop "atd" and disable autostart, set like follows.
root@ubuntu:~# initctl stop atd
atd stop/waiting
root@ubuntu:~# vi /etc/init/atd.conf
# Comment out
# start on runlevel [2345]
[3] It's possible to know jobs like follows which are executed when booting. And also it's possible to know the meanings for "start on ***" with "man upstart-events".
root@ubuntu:~# grep "start on" /etc/init/*
/etc/init/acpid.conf:start on runlevel [2345]
/etc/init/apport.conf:start on runlevel [2345]
/etc/init/atd.conf:#start on runlevel [2345]
root@ubuntu:~# man upstart-events
Table 1: Well-Known System Events Summary.
[4] For SysVinit one, for example, NTP, it's easy to manage them to install a tool like follows.
root@ubuntu:~# aptitude -y install sysv-rc-conf
root@ubuntu:~# sysv-rc-conf --list # list services
root@ubuntu:~# sysv-rc-conf ntp on # set auto-start for NTP
root@ubuntu:~# sysv-rc-conf ntp off # disable auto-start for NTP
Update System:
Run Aptitude repository update:
root@ubuntu:~# aptitude update
Run update the system
root@ubuntu:~# aptitude -y upgrade
Configuring SUDO
root@ubuntu:~# aptitude install sudo -y
To edit sudoers file, we use:
root@ubuntu:~# visudo
To give specific command permissions to certain user:
You can then give a specific user privileges to those commands like so:
The logs for sudo are kept in '/var/log/auth.log', but there are many kind of logs in it. So if you'd like to keep only sudo's log in a file, Set like follows:
root@ubuntu:~#visudo
--
# add at the last
Defaults syslog=local1
--
root@ubuntu:~# vi /etc/rsyslog.d/50-default.conf
# line 8: add
local1.* /var/log/sudo.log
auth,authpriv.* /var/log/auth.log
*.*;auth,authpriv.none -/var/log/syslog
root@ubuntu:~# initctl restart rsyslog
Install NTPd and Configure NTP server for time adjustment. NTP uses 123/UDP
root@ubuntu:~# aptitude -y install ntp
Comment-out existing servers and Add below servers as NTP servers:
vi /etc/ntp.conf
#server 0.ubuntu.pool.ntp.org
#server 1.ubuntu.pool.ntp.org
#server 2.ubuntu.pool.ntp.org
#server 3.ubuntu.pool.ntp.org
3.asia.pool.ntp.org (128.199.219.72)
2.asia.pool.ntp.org (157.7.208.12)
1.asia.pool.ntp.org (45.118.133.241)
# line 48: add the network range you allow to receive requests
restrict 10.0.0.0 mask 255.255.255.0 nomodify notrap
#service ntp restart
#ntpq -p #to check
You can also use crony as an alternative (to ntp).
Client also check /etc/ntp.cong for server. You need to specify the at Client side:
vi /etc/ntp.conf
server
To Update time instantly:
ntpdate
SSH server configuration:
root@ubuntu:~# aptitude install openssh-server -y
You can change below configuration for root direct login (enable/disable)
root@ubuntu:~# grep -i root /etc/ssh/sshd_config
PermitRootLogin without-password
Install ssh Client :
root@ubuntu:~# aptitude -y install openssh-client
To ssh to a remote machine, use:
#ssh -l
Transferring a file:
root@ubuntu:~# scp ram@ubuntu:/tmp/test /var/tmp/test
ram@ubuntu's password:
test 100% 245 0.2KB/s 00:00
ram@ubuntu's password:
Connected to ubuntu.
Fetching /tmp/test to /var/tmp/test
/tmp/test 100% 245 0.2KB/s 00:00
root@ubuntu:~# sftp ram@ubuntu
ram@ubuntu's password:
Connected to ubuntu.
sftp> pwd
Remote working directory: /home/ram
When using Windows, use WINSCP to connect to the ssh server and transfer files
SSH KEY-PAIR AUTHENTICATION
ram@ubuntu:~$ ssh-keygen #optionally you can use rsa or dsa using type (-t) option
ram@ubuntu:~$ ls .ssh
id_rsa id_rsa.pub
ram@ubuntu:~$ ssh-copy-id 192.168.171.171 #ssh Client IP
And now, you have password less access to ssh-server. If you set "PasswordAuthentication no", it's more secure.
ram@ubuntu:~$ grep PasswordAuthentication /etc/ssh/sshd_config
#PasswordAuthentication yes
root@ubuntu:~# initctl restart ssh
ssh start/running, process 2637
Windows ssh client putty:
http://www.chiark.greenend.org.uk/~sgtatham/putty/download.html
DNS FILES
/etc/resolv.conf # File where you specify DNS SERVER INFO
/etc/hosts #File acts as local dns resolver
/etc/nsswitch.conf #File to specify which dns (file or server ) gets resolve priority
File Sharing methods in Linux:
NFS
Samba
SFTP
FTP
SCP
RSYNC
Linux can serve any (all) of the following Storage Server(s):
LVM
NFS
ISCSI
Ceph
Gluster
SMB
Linux can use any (all) of the following Storage as Client:
LVM
NFS
ISCSI
FC
Ceph
Glusterfs
SMB
NFS Server and Client Configurations:
1) Install NFS server
#aptitude -y install nfs-kernel-server
2) introduce an NFS share
#vi /etc/exports
3) Restart NFS Server
# /etc/init.d/nfs-kernel-server restart
Client Configuration:
#aptitude -y install nfs-common
#initctl restart idmapd
#showmount -e
#mount -t nfs 192.168.171.171:/srv/nfs4 /mnt
#df -kh
#mount
#vi /etc/fstab
ISCSI Server installation (For Testing):
Install ISCSI server:
aptitude -y install iscsitarget iscsitarget-dkms
Create a Test Disk
dd if=/dev/zero of=/iscsi_disks/disk01.img count=0 bs=1 seek=500M
Make sure that ISCSITARGET_ENABLE is true, run following command to check this:
root@ubuntu:~# grep ISCSITARGET_ENABLE /etc/default/iscsitarget
ISCSITARGET_ENABLE=true
Update configuration file
#vi /etc/iet/ietd.conf
--
# add follows to the end
# if you set some devices, add *** and set the same way with follows
# naming rule : [ iqn.yaer-month.domain:any name ]
Target iqn.2015-05.world.srv:target00
# provide device as a iSCSI target
Lun 0 Path=/iscsi_disks/disk01.img,Type=fileio
# iSCSI Initiator's IP address you allow to connect
initiator-address 192.168.171.171
# authentication info ( set anyone you like for "username", "password" )
incominguser ram password
--
Restart the ISCSI Daemon:
/etc/init.d/iscsitarget restart
Confirm status
ietadm --op show –tid=1
CLIENT Configurations:
Client package Installation:
#aptitude -y install open-iscsi
Specify the authentication:
root@ubuntu:~# vi /etc/iscsi/iscsid.conf
# authentication by the target(s), uncomment the following lines:
node.session.auth.username = ram
node.session.auth.password = password
Discover Targets:
root@ubuntu:~# iscsiadm -m discovery -t sendtargets -p 192.168.171.171
192.168.171.171:3260,1 iqn.2015-05.world.srv:target00
Confirm Status After Discovery:
root@ubuntu:~# iscsiadm -m node -o show
Login to the target:
root@ubuntu:~# iscsiadm -m node --login
Logging in to [iface: default, target: iqn.2015-05.world.srv:target00, portal: 192.168.171.171,3260] (multiple)
Login to [iface: default, target: iqn.2015-05.world.srv:target00, portal: 192.168.171.171,3260] successful.
Check sessions:
root@ubuntu:~# iscsiadm -m session -o show
tcp: [1] 192.168.171.171:3260,1 iqn.2015-05.world.srv:target00
Confirm Partition:
root@ubuntu:~# cat /proc/partitions
major minor #blocks name
8 0 20971520 sda
8 1 19921920 sda1
8 2 1 sda2
8 5 1046528 sda5
11 0 1048575 sr0
8 16 512000 sdb ← Our newly added lun
root@ubuntu:~# fdisk -l /dev/sdb
Disk /dev/sdb: 524 MB, 524288000 bytes
17 heads, 59 sectors/track, 1020 cylinders, total 1024000 sectors
Units = sectors of 1 * 512 = 512 bytes
Sector size (logical/physical): 512 bytes / 512 bytes
I/O size (minimum/optimal): 512 bytes / 512 bytes
Disk identifier: 0x00000000
Disk /dev/sdb doesn't contain a valid partition table
You have an up and online LUN in your system.
Disk Management tools:
fdisk
parted
Install Parted:
root@ubuntu:~#aptitude -y install parted
Create a label:
root@ubuntu:~# parted --script /dev/sdb "mklabel msdos"
Create a partition:
root@ubuntu:~# parted --script /dev/sdb "mkpart primary 0% 100%"
Create EXT4 Filesystem:
root@ubuntu:~# mkfs.ext4 /dev/sdb1
Mount the file system and check:
root@ubuntu:~# mount /dev/sdb1 /mnt
root@ubuntu:~# df -hT
FDISK
Create a partition on disk
root@ubuntu:~# fdisk /dev/sdb
Command (m for help): m # Use 'm' print the menu
Command action
a toggle a bootable flag
b edit bsd disklabel
c toggle the dos compatibility flag
d delete a partition
l list known partition types
m print this menu
n add a new partition
o create a new empty DOS partition table
p print the partition table
q quit without saving changes
s create a new empty Sun disklabel
t change a partition's system id
u change display/entry units
v verify the partition table
w write table to disk and exit
x extra functionality (experts only)
Search tools (commands):
Find
locate
grep
Linux can serve as any of the following Virtual server :
KVM
Xen
LXC (for containers)
Docker (for Container)
Openstack (Cloud computing)
Cloud-stack (Cloud computing)
VMware Workstation
Virtualbox (Oracle)
Many more
This is a rough (initial) document. Please share your feedback on this. I would be coming as with Proper Ubuntu "Zero2Pro" document soon.
Subscribe to:
Posts (Atom)